


Portrait Photography: My Perspective
- Morgan Davis
- May 9, 2017
- 3 min read
Since it has been nearly six months since I have written a My Perspective post (wow that's a long time!), I wanted to write about portrait photography this week. If you follow me on Instagram, you know that I primarily take these types of shots. Let's begin with how I define portrait photography. My type of portrait photography is a photo of a person that captures their personality artistically. Now, let's learn how to take portrait photos.
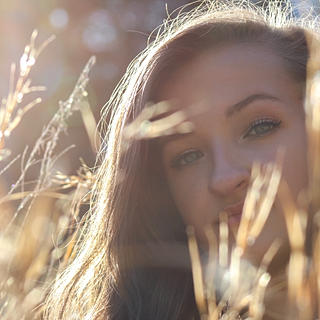
Lighting: This is one of the most important aspects of your photos. You want to make sure that you have consistent and soft light. Uneven lighting can distract from a photo and is one of the worst things to have in a final photo.
When shooting outdoors, just ensure that you are going at a time where the sunlight isn't harsh, or go on a cloudy day. If you have no choice but to shoot in harsh light, try to find shade or turn your subject so that the sun doesn't create uneven shadows and your subject isn't squinting or washed out.
Below there are two examples of photos I have taken, one with good lighting and one with uneven lighting.


Posing: If this is your first time shooting with a certain person, try to make them feel as comfortable as possible. People often freeze up and act awkward when you begin taking pictures. Just try to direct them into poses and show them how to do it naturally.
Please for the love of everything good; DO NOT pose your model like this:

Image credit: So Bad So Good
It may take a few times, but with help and encouragement, anyone can learn how to model.
Below are two shots of good, natural poses, a full body shot and a head shot. You can experiment with different poses to see what fits your model's personality best.


Equipment: When shooting portrait shots, I use a Canon Rebel T5 with a 75-300mm lens. It is usually suggested to use a smaller lens for portrait shots and a larger lens for action/sports shots. I, however, prefer to use a large lens for portraits.
It makes the subject more prominent and the background blurrier, which creates a well contrasted and defined photo.
Since the T5 is such a great camera, I suggest just shooting in auto when you are in a well lit area. When you are in a darker or brighter area, switch to manual and configure your settings to suit your environment best.
Below is a photo that I took with a 75-300mm lens and to the under that is a photo I took with a standard 18-55mm lens. Notice the background and how much more prominent the subject looks in the first photo.


Cropping: You can either crop your picture to be full body, or just head and shoulders. If you are shooting with a large lens to create a blurry background, head and shoulder shots look best. If you are shooting with a smaller lens, focus on full body shots.
If you are a beginner, try to focus on head and shoulder shots. It is easy to take natural, not-awkward shots when it is cropped like this.
If you want to experiment with full body shots, make sure that you do not crop off any body parts (unless it is done correctly with creative motives).
Below is a head and shoulders shot and under that is a full body shot. Notice how they are cropped and how this helps enhance the mood of the picture.


Editing: I use Photoshop Lightroom to edit all of my photos and it is the best editing software that I have come across. You can purchase the pro version, but the standard free app works just fine.
It includes features to help you correct lighting without degrading the quality of the photo, color correct, and multiple other effects to help you result in the best photo.
Below are some before and afters that I have used Lightroom to edit.


Be Creative: Just remember to find your own style and take photos in the way you like. There are multiple Instagram accounts that you can look at for inspiration. If you want to see some of my favorite accounts, view this article that I wrote about creative photography.
Thank you so much for reading this article. I hope you learned more about portrait photography and hopefully this will help you implement some easy steps into your photos.
Comments